
Switching From Slate to Hammerspoon
Window management on OS X is… well… not a strong point. I want to move windows around with ease and precision. It turns out I’m not alone. There’s no shortage of applications claiming to fix windowing and increase productivity. For a while I used Divvy. It did a fine job. Before long I realized my windows ended up in the same places. I needed to save layouts. I needed more control.
In stepped Slate. It sounded perfect.
Slate is a window management application similar to Divvy and SizeUp (except better and free!).
For a long time Slate did everything I wanted. Only it hasn’t been updated since early 2013.
While looking for a replacement I stumbled across something new.
Hammerspoon
It isn’t a window manager. Hammerspoon bills itself as, “a tool for powerful automation of OS X.” Oh, don’t get me wrong, it can manage windows. It can also watch your USB port, inspect your WiFi, manage audio, control Spotify, and the list goes on. Hammerspoon is a framework for total system control.
Its reach comes from a series of interfaces written in Lua. Its power comes from letting you use Lua itself to script them together. Slate’s configuration is done through a series of directives. It limits what you can do. Hammerspoon hands you Lua and figures if you want to burn the house down it was yours to begin with.
Let’s Talk About Lua
I’d never worked with Lua before Hammerspoon. It raised a red flag for me. I was going to have to learn the Hammerspoon interfaces and Lua. Every project has an effort to reward ratio. I thought that the effort here might be too high. I decided that it would be good to know Lua and I could always cut and run if it got too bad.
It turns out you don’t really have to know Lua. Only enough to glue some interfaces together. At no point in my Hammerspoon progression was Lua the bottleneck. My concern was unfounded.
Moving Windows
I don’t have a particularly complex setup. But what I do have are a very particular set of keys, keys that I have become acquainted with over my career. For a modifier I use a combination of Ctrl and ⌘. Moving the focused window works on a grid of keys with k at the center.
To send a window to the left side of the screen, I press the modifier combo and j. The first press makes the window take up half of the screen. Another press and it will take up two-thirds of the screen. One more press and the window occupies one-third of the left side. Pressing again and again cycles the options. The right side works the same way using l. Left and right are two of my most used positions. I find the varying sizes to be helpful.
Using i sends the window to the top half and , to the bottom half. The corners of the grid do what you might expect and move windows to the top left quarter of the screen, top right quarter, bottom left quarter, and bottom right quarter.
The k in the middle puts the window in the center of the screen. A second press maximizes the window and repeated presses once again cycle the options.
To do this I created a list of possible positions.
positions = {
  maximized = hs.layout.maximized,
  centered = {x=0.15, y=0.15, w=0.7, h=0.7},

  left34 = {x=0, y=0, w=0.34, h=1},
  left50 = hs.layout.left50,
  left66 = {x=0, y=0, w=0.66, h=1},

  right34 = {x=0.66, y=0, w=0.34, h=1},
  right50 = hs.layout.right50,
  right66 = {x=0.34, y=0, w=0.66, h=1},

  upper50 = {x=0, y=0, w=1, h=0.5},
  upper50Left50 = {x=0, y=0, w=0.5, h=0.5},
  upper50Right50 = {x=0.5, y=0, w=0.5, h=0.5},

  lower50 = {x=0, y=0.5, w=1, h=0.5},
  lower50Left50 = {x=0, y=0.5, w=0.5, h=0.5},
  lower50Right50 = {x=0.5, y=0.5, w=0.5, h=0.5}
}
You’ll notice that Hammerspoon, hs, provides some predefined positions like left50.
The others use a simple percentage ranging from 0 to 1.
Next I needed to be able to bind keys. I made a short helper function to avoid having to retype my modifier combo.
function bindKey(key, fn)
  hs.hotkey.bind({"cmd", "ctrl"}, key, fn)
end
See, it’s nice to have a language rather than a config. Next, I layout my grid.
grid = {
  {key="u", units={positions.upper50Left50}},
  {key="i", units={positions.upper50}},
  {key="o", units={positions.upper50Right50}},

  {key="j", units={positions.left50, positions.left66, positions.left34}},
  {key="k", units={positions.centered, positions.maximized}},
  {key="l", units={positions.right50, positions.right66, positions.right34}},

  {key="m", units={positions.lower50Left50}},
  {key=",", units={positions.lower50}},
  {key=".", units={positions.lower50Right50}}
}
Finally, I loop over each entry in the grid and bind the key.
hs.fnutils.each(grid, function(entry)
  bindKey(entry.key, function()
    local units = entry.units
    local screen = hs.screen.mainScreen()
    local window = hs.window.focusedWindow()
    local windowGeo = window:frame()

    local index = 0
    hs.fnutils.find(units, function(unit)
      index = index + 1

      local geo = hs.geometry.new(unit):fromUnitRect(screen:frame()):floor()
      return windowGeo:equals(geo)
    end)
    if index == #units then index = 0 end

    window:moveToUnit(units[index + 1])
  end)
end)
There are a couple of lines in there that might be confusing but the gist of it should be easy to follow.
Most of the unknowns involve getting to know how Hammerspoon handles window placement (i.e. geometry).
The only Lua difficulty I had came in finding how to get the length of units.
It turns out you place a # in front of the list.
Keep in mind that this cycles through the “units”. If you’re alright with a key doing only one thing then it can be greatly simplified.
hs.fnutils.each(grid, function(entry)
  bindKey(entry.key, function()
    hs.window.focusedWindow():moveToUnit(entry.unit)
  end)
end)
Hammerspoon comes with a grid system out of the box. I started with it but decided to pivot and roll my own. It wasn’t significantly harder and it let me reuse the positioning in my layouts.
Layouts
Hammerspoon has built in support for layouts.
bindKey('1', function()
  hs.layout.apply({
    {"Firefox", nil, screen, positions.left50,         nil, nil},
    {"Mail",    nil, screen, positions.upper50Right50, nil, nil},
    {"Slack",   nil, screen, positions.lower50Right50, nil, nil}
  })
end)
That’s it.
There are lots of nils in there.
The first one is a window title sub selector.
That way you can move around different windows for the same application.
The final two allow for different styles of screen positioning.
For my purposes they were unnecessary.
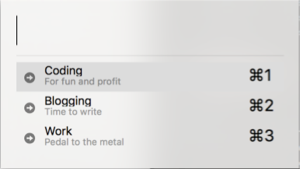
I created a list of common layouts for myself and everything worked. I’ve even gone as far as adding sizes to the layouts for my laptop screen vs my large monitor. Rather than numbering the layouts I’ve used another feature, the chooser. It’s basically an Alfred window.
Eventually I hope to switch to using Alfred directly.
Future Work
You can see everything I’ve done so far in my current config. I’m sure there’s room for improvement but it’s a good start. It may seem like this is a lot of work. In the end I’m learning Lua, getting the setup I want, and learning a system that can automate other troubles I’ll run into. Also, I like it. It makes for a fun mini-project.